How to Make a Tulle Train Skirt
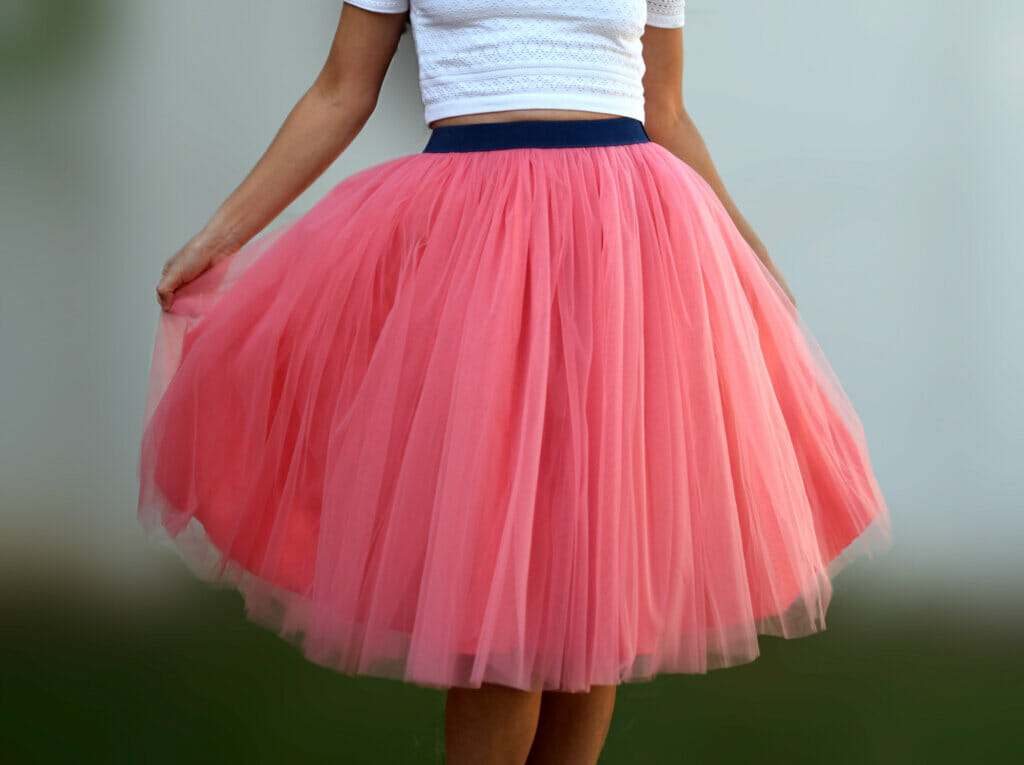
This DIY tulle skirt is definitely one of the most fun pieces in my wardrobe! Do you like it? If so, you can make one with me.
How much tulle do you need for a skirt? What type of tulle is best for this skirt? Does tulle have to be hemmed, and what needle should you use for tulle fabric?
In this easy step-by-step tutorial, I will answer all these questions and I'll show you how to create your own tulle skirt, with lots of photos and tips & tricks.
Before we start, let me tell you the basics of making this tulle skirt – it's actually a very simple skirt.
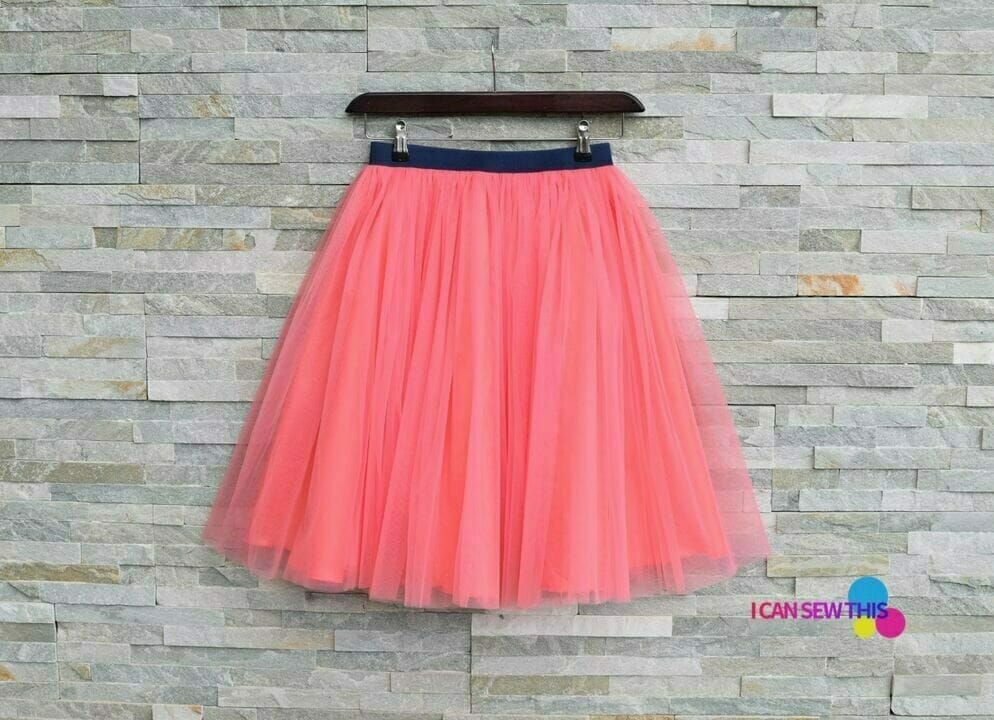
Fundamentally, this is an exposed elastic gathered tulle skirt, with a ratio of approx. 1:8 (the tulle skirt width is 8x the waist measurement), lined with a half-circle skirt.
The ratio 1:8 may seem unreasonable for a gathered skirt, but keep in mind that tulle is a very lightweight fabric and I fancied a pleated look for my skirt.
So, how much tulle do you need for a skirt like this?
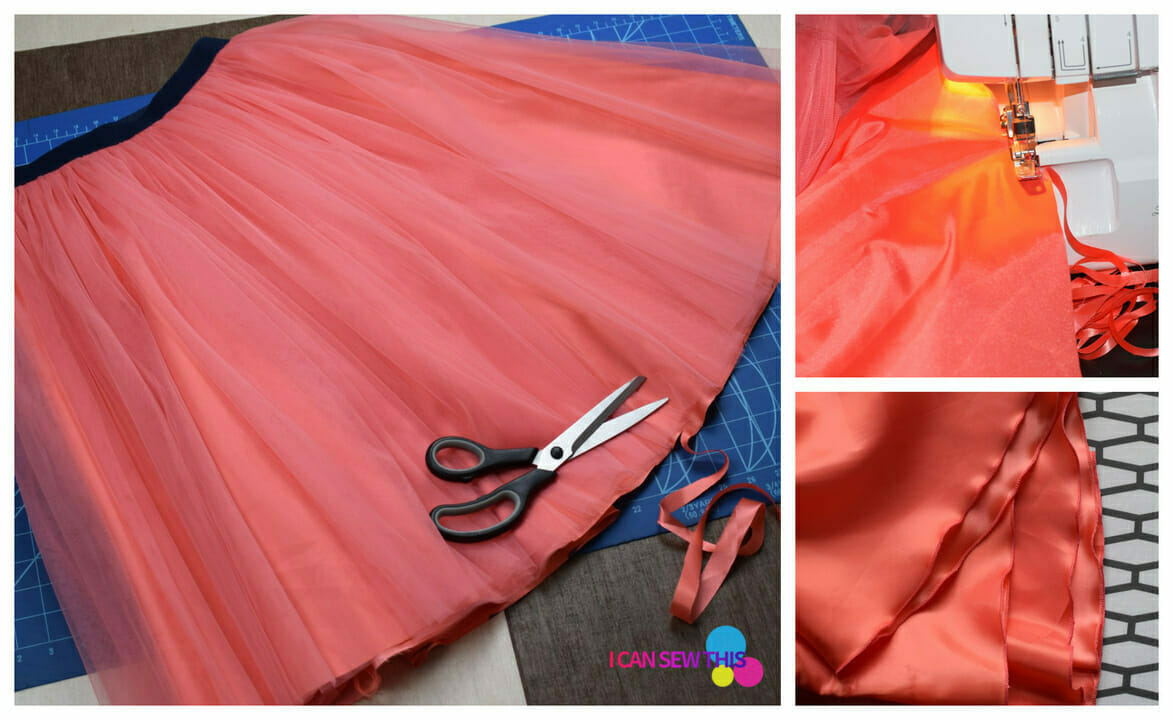
To make the tulle part, I cut four identical rectangles of tulle, each measuring 118 inches (300 cm) in width x 23 inches in length, then sewed them together two by two. I basted through the two layers of tulle, each measuring now 236 inches x 23 inches, and then I gathered the tulle to match the top of the skirt lining.
If you want a less-full skirt or less pleats, you could make this skirt using only three or even two rectangles of 118" soft tulle. Or you could adjust the width of the tulle, using rectangles of 100" or 150" wide soft tulle. That's up to you, really!
To make this DIY tulle skirt, you will need approximately 3-4 yards of 118 inches (300 cm) super wide soft tulle. However, if you can't find 118-inches wide tulle, don't worry. Just make sure you use a soft tulle fabric – the type that's available in bolts, and you can always join fabric widths to make an extra-wide panel.
My option for the lining is a half-circle taffeta skirt – for this part, you need 2 yards of fabric. I wanted something not only to provide opacity but to hold its shape better, so the skirt can have a lot of volume without being too bulky at the waist. I sewed together the gathered tulle layers and the taffeta skirt, then I stitched the exposed elastic to the garment's top edge. That's it!
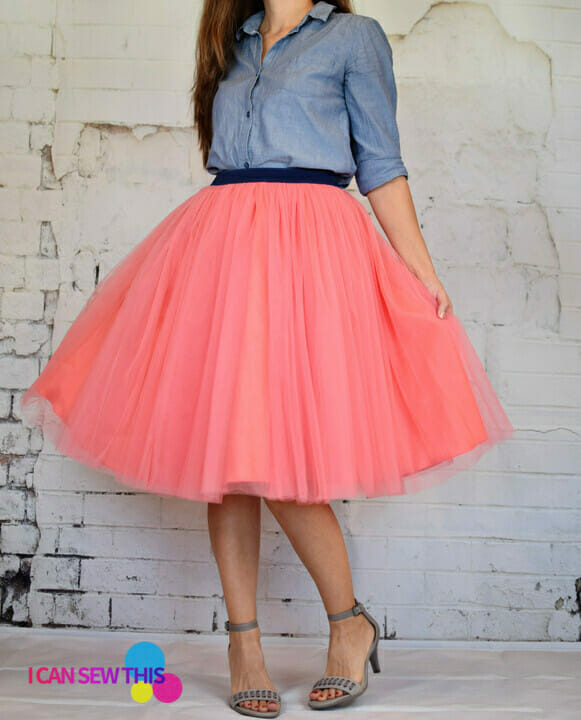
I fell in love with midi skirts and pleated skirts this summer and this is how the pink tulle skirt came to life.
It's pleated, it's fluffy, it's girly, it highlights the waist by keeping it cinched in with the exposed elastic, and it has plenty of volume on the hem. How could I want more?
It is indeed a little tricky and tedious to sew with yards and yards of tulle, but I think this gorgeous skirt is all worth it!
What is tulle fabric?
Tulle is a lightweight, very fine netting, most commonly made of polyester fibers. Tulle fabric has a dreamlike texture, lightweight and delicate. It is commonly used for making wedding outfits and dance costumes, but tulle skirts are not just for brides, ballerinas, and little girls.
Lately, lots of girls and ladies wear tulle skirts in the streets with cozy, everyday clothes and they look so fresh and stylish! It's pretty cool, I guess!
And what's not to love about tulle skirts? They are so spectacular and elegant, nevertheless easy to style. A tulle skirt can transform you into a modern princess right away, even if you wear sneakers and a t-shirt. I needed this in my wardrobe!
- Gathered tutu skirt tutorial
- Circle tulle skirt tutorial
- How to make reusable produce bags tutorial
Tips for sewing with tulle
Does tulle have to be hemmed? No. Tulle fabric does not fray and that is awesome! It means you can just sew seams with a straight stitch and leave edges unfinished – be sure to use a long stitch, like 3 or 4 mm.
What needle do you use for tulle? Most sources tell us to use a thin needle such as a size 70, but the truth is that you can use whatever kind of needle you have on hand.
How to get wrinkles out of tulle? You can iron the tulle fabric directly. I read on many blogs that you should never iron tulle directly, as it can melt. It's not true! I have always used the iron on tulle, at a low heat setting, and it does wonders for those inevitable wrinkles.
Tulle is a slippery fabric that can be difficult to sew for the first time. Before sewing through layers of tulle, if you're a beginner, it may be a good idea to secure the layers with long pins or safety pins and remove them as you sew.
To prevent shifting and to keep the seam strong, you can use a small strip of tissue paper underneath the fabric when you sew the tulle seams. After stitching the seam, tear the tissue away.

DIY tulle skirt tutorial – Fabric choice
I used for my tulle skirt 300 cm / 118 inches super wide soft tulle fabric – the type that's available in bolts and sold in yards – and a lightweight taffeta for the skirt lining.
Satin fabric is fine too for the lining. However, I chose taffeta because its crispness creates a fuller skirt. And besides, taffeta has that fabulous "swish" when the skirt moves – irresistible!
The elastic for my skirt is 1 ½ inches wide, and it's navy blue because I didn't have any other elastic to match the pink tulle. I didn't want to insert a zipper, either.
Sewing supplies – DIY tulle skirt
- 3-4 yards of 118 inches (300 cm) super wide soft tulle
- 2 yards of satin/taffeta fabric for the skirt lining
- 1 ½ – 2 inches wide elastic
- sewing machine
- sewing machine needle
- matching thread
- fabric scissors
- rotary cutter
- cutting mat
- fabric marking pencil
- sewing pins
How to make a tulle skirt in 10 simple steps
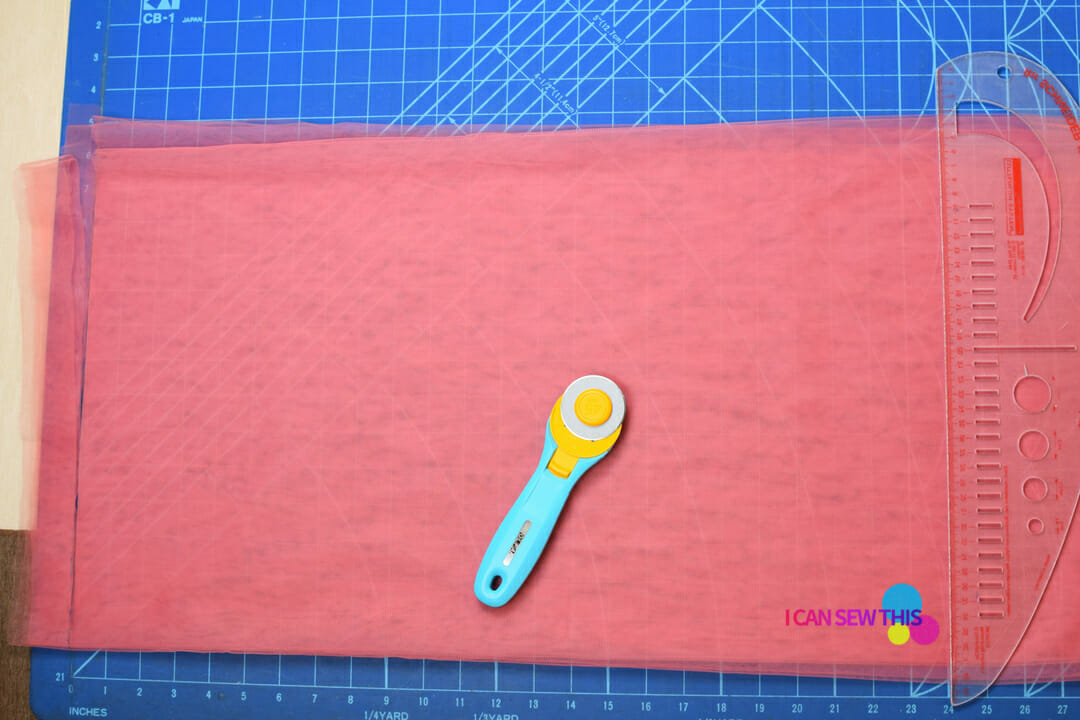
Step 1 – cut the tulle fabric pieces
Decide on the desired length of your skirt and add 1 inch to that measurement. This will be the length of your tulle pieces, each 118 inches (300 cm) wide. You need 4 such rectangles of tulle fabric.
If you use 118 inches wide tulle, fold the yardage 3 times so the width of the fabric becomes approximately 14.7 inches. Now it's a piece of cake to cut the tulle. Use a rotary cutter, a ruler, and a self-healing mat, this way it's easier to get a straight edge.
If your fabric is wrinkled, iron it before you cut the pieces. Use a low heat setting and you're safe to go.
I wanted my skirt to be 23″ long, so I cut 4 pieces of tulle, each measuring 118 x 24 inches.
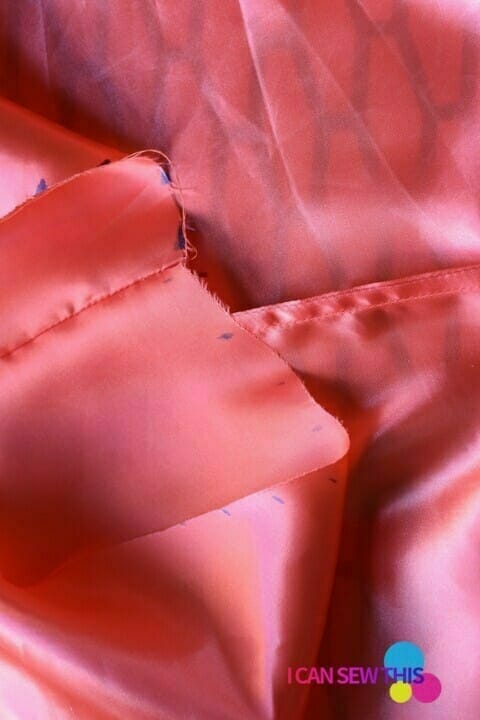
Step 2 – cut the lining
Measure your hips – since we're using an elastic waistband, the skirt opening has to be big enough to fit over your hips.
I added 2 inches to this measurement, just to be sure – 35+2=37 inches in my case. This is the length of the circular line that will be on the waist.
Now take this measurement and divide by 3.14 to get thewaist radius. I used the circle skirt calculator from byhandlondon.com to determine the waist radius for a half-circle skirt – which is 11 ¼ inches in my case.
For the length of the skirt lining, I added 1 inch to the length of the tulle pieces. That extra inch is for the hem. You don't need to hem the tulle, but the taffeta frays and you need to do something about it.
Waist radius – 11 ¼ inches
Desired length of skirt – 23+1=24 inches
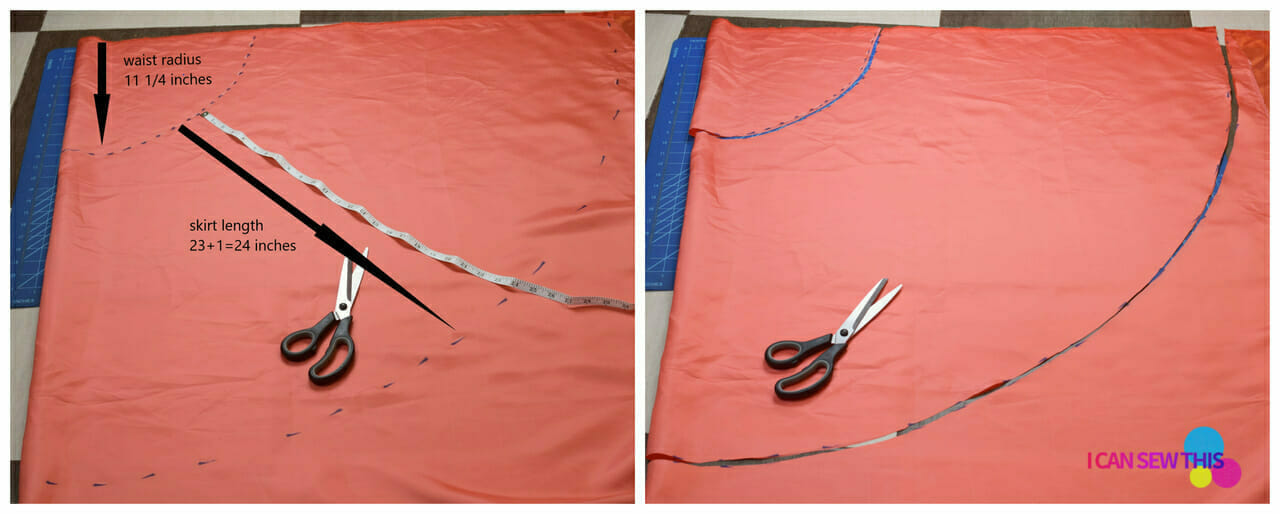
I used a regular marker to trace the lines, so you can see better what I did, but you should use a tailor's chalk or a fabric pencil.
Lay the lining fabric on the floor and fold it in half, so that selvage edges coincide.
Measure out from the top corner using the waist radius to create a curve, as shown. Now, measure again to create a hem curve, this time using the skirt length.
Step 3 – sew the side seams for the lining
Sew the side seam of the lining – place the fabricwrongsides together, pin and slowly sew it.
You can finish the seam with a serger (in which case you should sew the side seam with the fabricright sides together), but I prefer the french seam method.
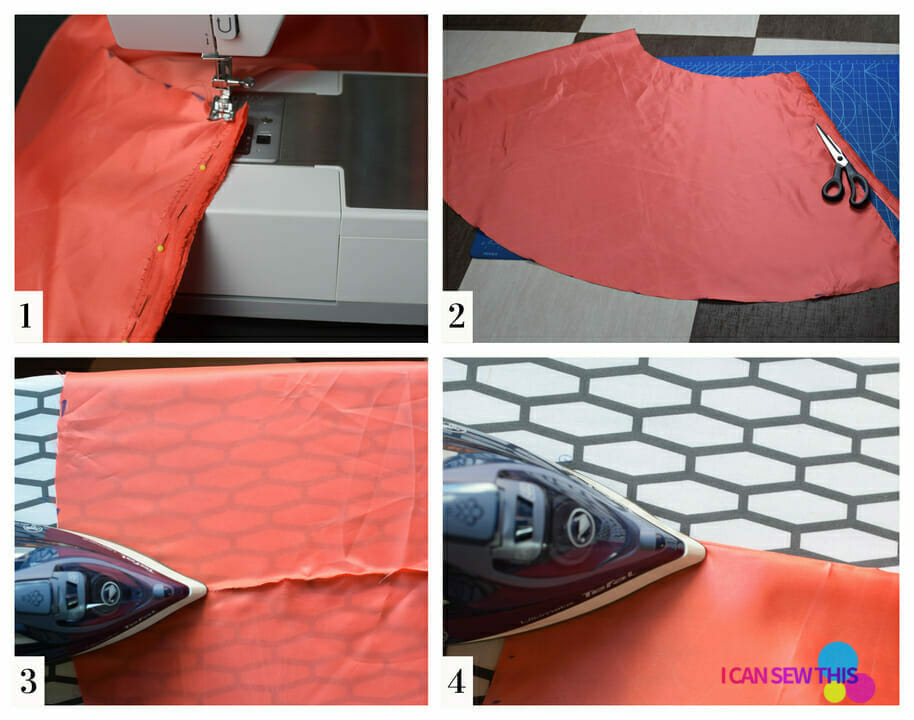
I trim the seam allowance and press with an iron.
Then, I turn fabricright sides together, press again, and stitch to encase the raw edges within the seam allowance. Now there are no visible raw edges to fray.
Step 4 – sew the side seams for the tulle
Lay two of the tulle layers on top of each other. Make sure edges are aligned and sew the side seams. Backstitch to secure the seam at both ends.
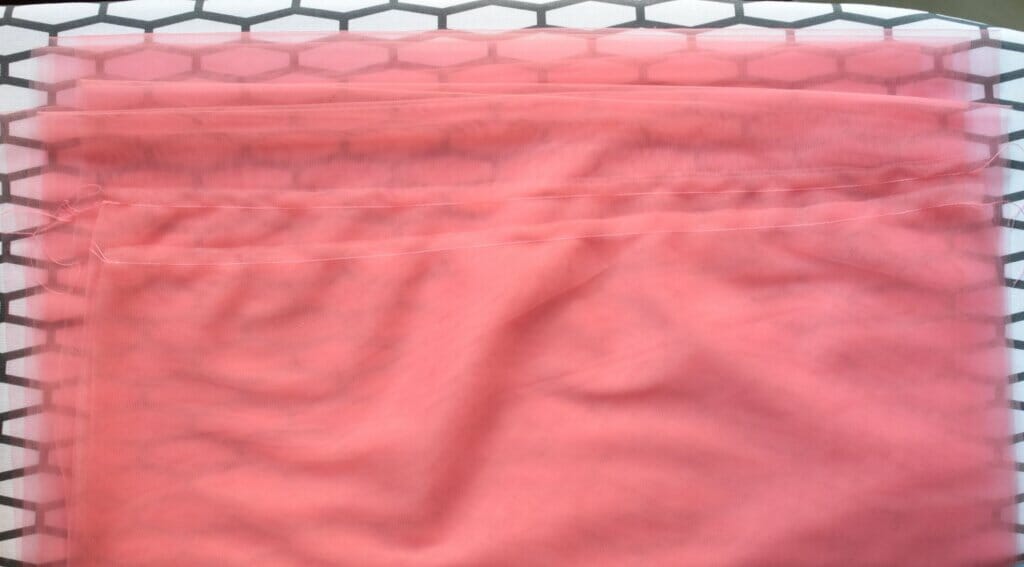
Repeat for the last two tulle layers.
To sew the tulle seams without puckering, switch your needle for a newballpoint/jersey needle – size 70/10 is what I used. Then, use a short straight stitch and slow down your sewing machine speed to avoid puckering. Find more tips on how to sew with tulle fabric here.
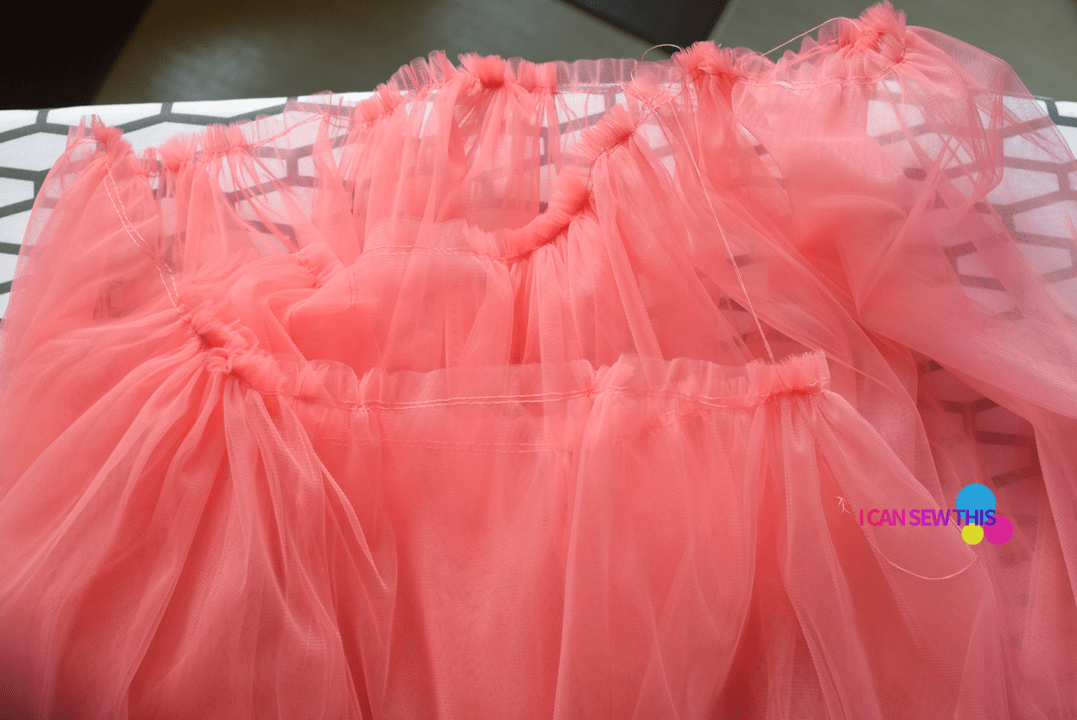
Step 5 – baste the tulle layers around the waistline
In the previous step, you sewed the initial four pieces of tulle to create two very large fabric tubes, each measuring 2 x 118=236 inches in width.
Now, you have to align the side seams of those two tulle tubes, right side to wrong side of the fabric, and baste through the two layers.

Change the stitch length to the longest possible and run two parallel lines of basting stitches. Leave long thread tails at the beginning and end of each row, and do not backstitch!
This is rather tedious, but take your time, as you don't want to cross the sewing paths of your lines. Soon enough, all of this will be worth it.
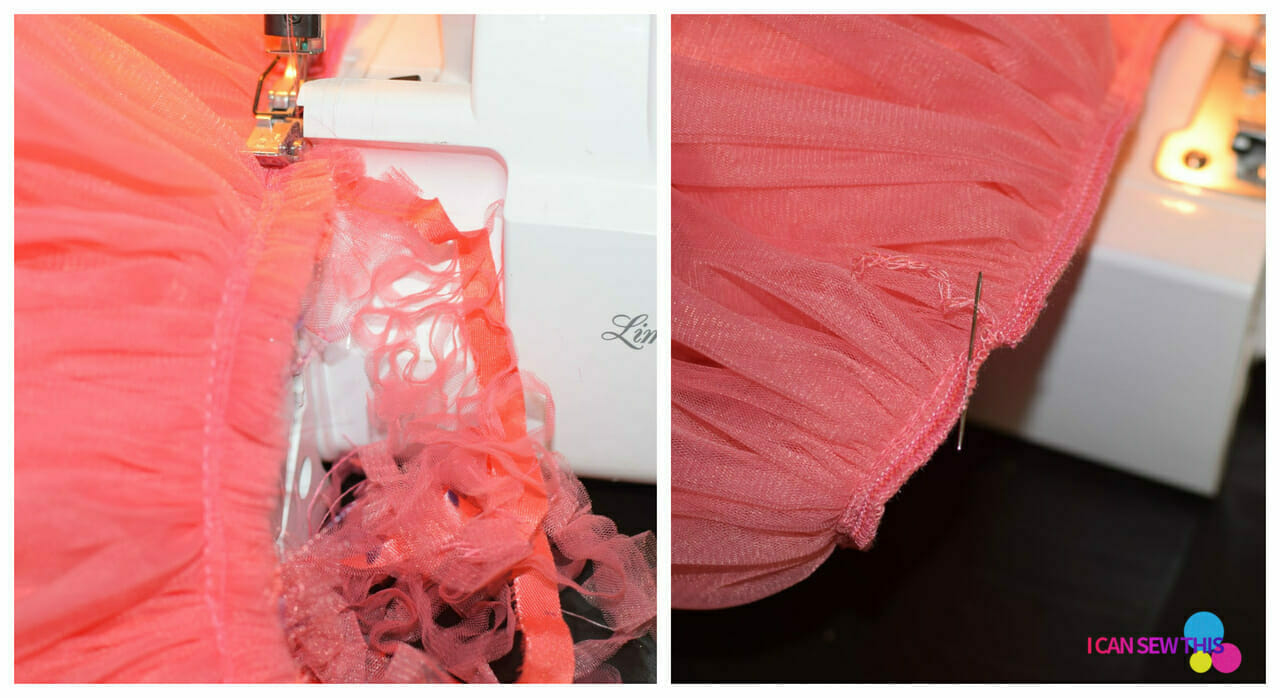
Step 6 – gather the tulle to match the top of the skirt lining
Let's create the gathers. Grab the two top threads with one hand and push the tulle fabric over with the other hand.
Continue until the gathers are evenly distributed and match the top of the skirt lining, then tie the threads in a knot.
Step 7 – sew the tulle and the lining together
Place the skirt lining inside the tulle – the satin right side to the tulle wrong side – pin and stitch across the gathering line.
I placed the lining back seam in the middle of the tulle side seams.
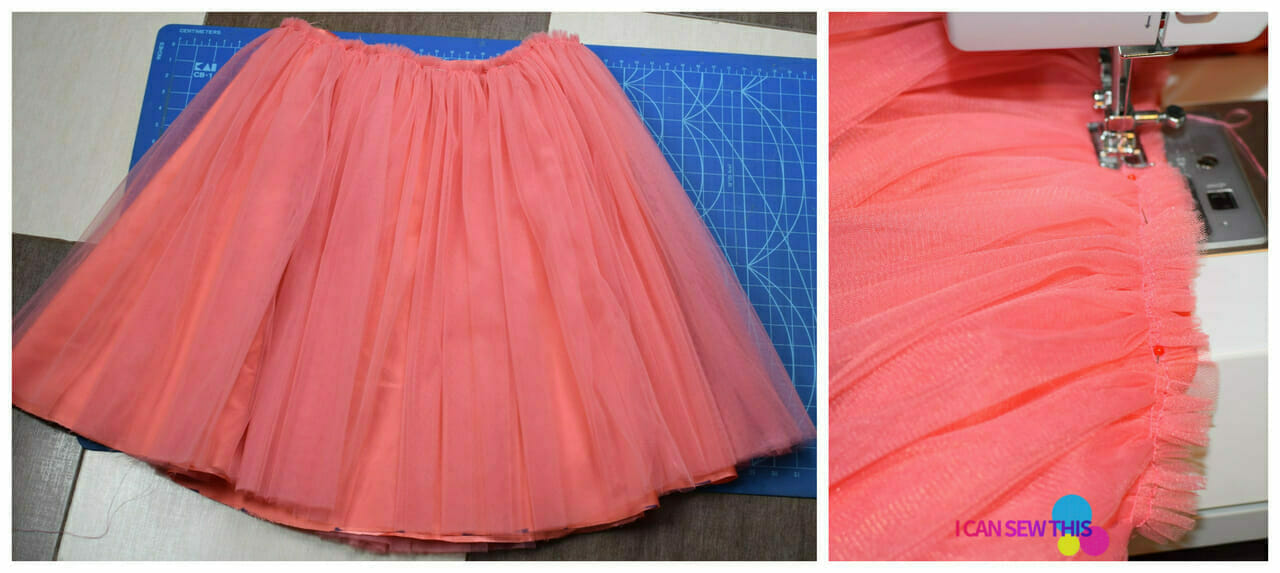
Finish the waist seam with a serger.
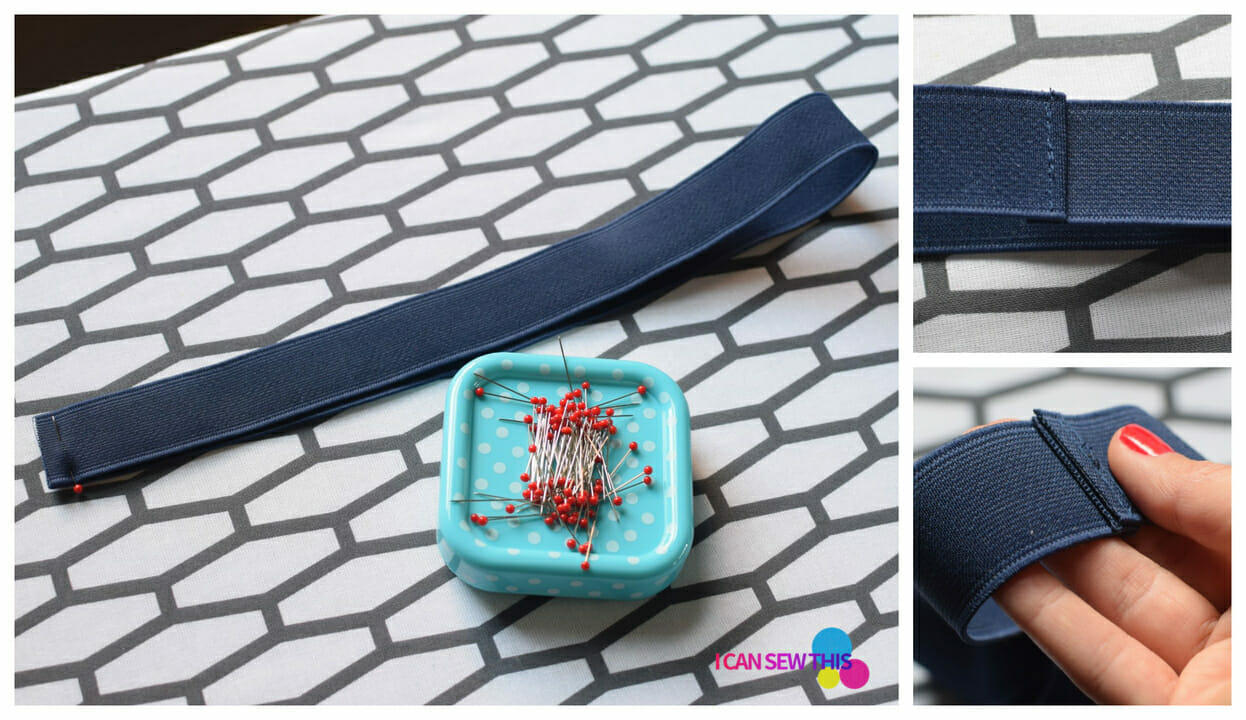
Step 8 – prepare the elastic
Cut your elastic band, so it comfortably fits around waist when stretched. Add ½ inch for the seam allowance. Sew the ends of your elastic together.
Step 9 – sew the elastic to the skirt
Mark the tulle waistband and the elastic in four equal segments – the center back, the center front and the two points halfway on each side.
Match the pins and sew the elastic to the skirt, the wrong side of the elastic to the right side of the skirt.
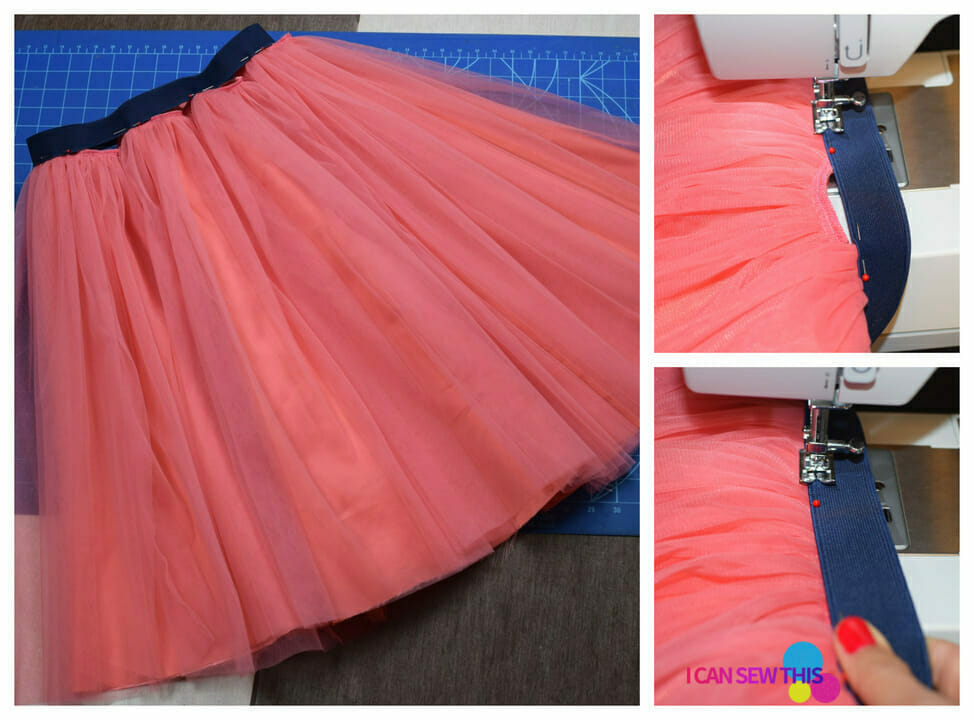
The elastic band will be smaller than the skirt opening (that's measured to the widest part of your hips), so you need to stretch the elastic towards you (one hand in the back and one in the front, pulling both ways) until the fabric gap straightens out.
Don't hurry, sew slowly and stop every time before you reach a new pin and remove it.
Make sure the needle is in the down position when you stop. I sewed the elastic to the skirt using a straight stitch.
Step 10 – hem the lining
All we have to do now is to hem the skirt lining – use sharp scissors and trim excess fabric from the bottom, but be careful to not cut through the tulle.
I finished the edge of the lining with a narrow rolled hem on the serger.
The lining layer is a bit shorter than the tulle layers – I like this look better.
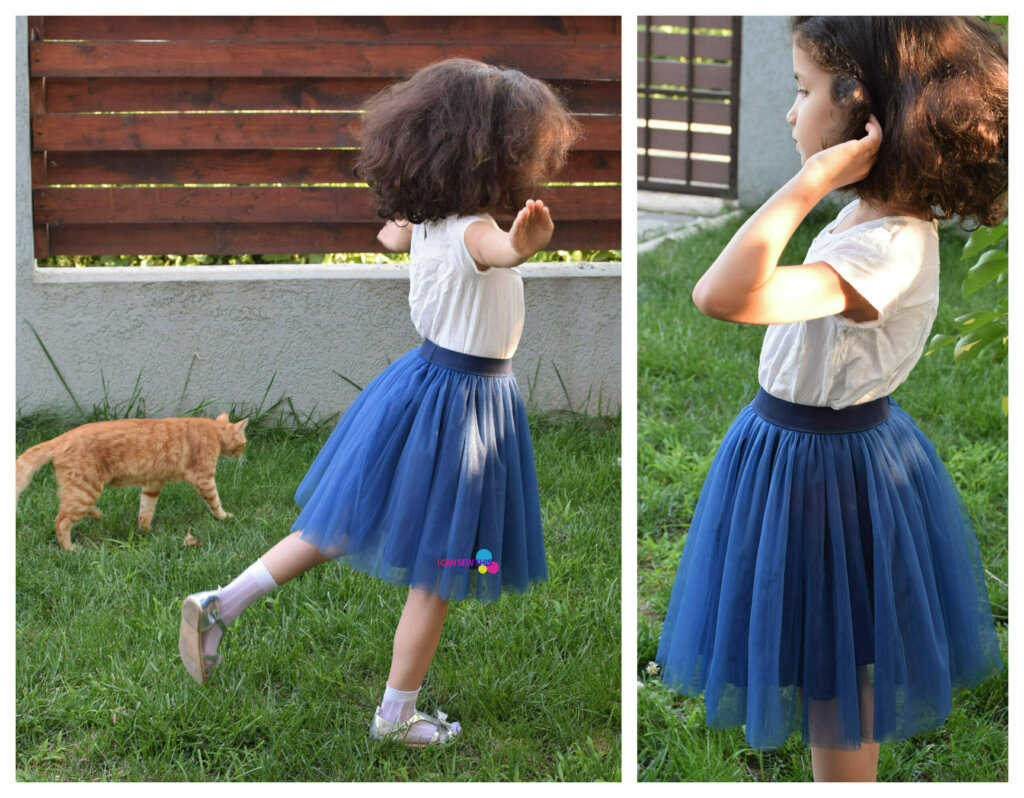
I also made a pleated tulle skirt for my daughter, following the same steps, but a less-full skirt this time.
The little navy tulle skirt has three tulle layers of 118" soft tulle, all basted and gathered simultaneously, as opposed to two super-wide tulle layers for the pink tulle skirt – see Steps 4 and 5.
How to care for your tulle skirt
- To keep your tulle skirt in the best shape and to prevent wrinkling it's best to store it on a clothes hanger.
- You can wash your tulle skirt by hand, or in the washing machine – in this case, turn the tulle skirt inside out, place it in a laundry bag, and use a mild detergent and a gentle cycle. Wash in cold water and dry it in low heat.
- You can iron the tulle skirt to remove wrinkles, just make sure you use the lowest heat setting and keep the iron moving on the garment. Don't touch the tulle with the hot iron because the tulle will melt instantly. To be on the safe side, place a towel on top of the tulle so that you will not burn your skirt.
Did you find this tutorial helpful? I'd like to hear what you think of it!
And I would LOVE to see pictures! If you give this DIY tulle skirt a try, please tag me on Instagram or Facebook or send some photos by email.
Let's keep in touch! You can find me on Facebook, Instagram, and Pinterest.
How to Make a Tulle Train Skirt
Source: https://icansewthis.com/how-to-sew-a-tulle-skirt/
0 Response to "How to Make a Tulle Train Skirt"
Post a Comment